How to Create a Catalog in InDesign: Designer Tips for a Smooth Process
Last updated: October 20, 2025
Creating a catalog in InDesign can seem daunting, especially for those unfamiliar with the tool. However, its advanced features enable the creation of high-quality, professional marketing materials that drive engagement and conversions.
Another common myth is that InDesign is only for PDFs or books. In reality, businesses can design various marketing assets, including interactive digital catalogs, brochures, and sales collateral. All essential elements for sales and brand consistency.
If your team is just starting with InDesign for catalog creation, finding the right resources can be time-consuming.
That’s why, in this article, I’ll answer questions like how to make an InDesign catalog template, how to make a catalog in InDesign, and how Flipsnack’s extension can help you save time.
So whether you’re designing product catalogs, sales materials, or corporate brochures, this guide will help you streamline your process and achieve professional results.
In a nutshell, this tutorial will show you how to make a catalogue step by step, from planning to publishing.

Table of contents
- How to create a catalog in InDesign
- Step 1: Get inspired for your moodboard
- Step 2: Edit your (product) pictures
- Step 3: Create the document in InDesign
- Step 4: Choose the right layout
- Step 5: Structure catalog information using InDesign elements
- Step 6: Add new pages, create a spread
- Step 7: Design the front and back cover
- Step 8: Export your digital catalog
- Step 9: Publish your catalog (via hosting service or a web app)
- Flipsnack’s InDesign catalog extension
- Create a high-impact InDesign catalog with Flipsnack
- Frequently asked questions about creating catalogs in InDesign
How to create a catalog in InDesign
When it comes to creating your catalog design using InDesign, there are a couple of aspects that need extra attention. Even if you have the InDesign basics covered, we’ll take the catalog creation process step by step, highlighting a couple of best practices to abide by in order to have a smooth experience overall.
Take a look at the following video that takes you through every step of the process, if you’re more of an audio learner.
And now, the written step-by-step process:
Step 1: Get inspired for your moodboard
Every design needs a moodboard in order to achieve its intended purpose. When we talk about digital catalogs, their purpose is to convert viewers into customers. So, starting with the kind of products you will advertise, create a few design guidelines. Make sure you stick to the color palettes used by the brand in question.
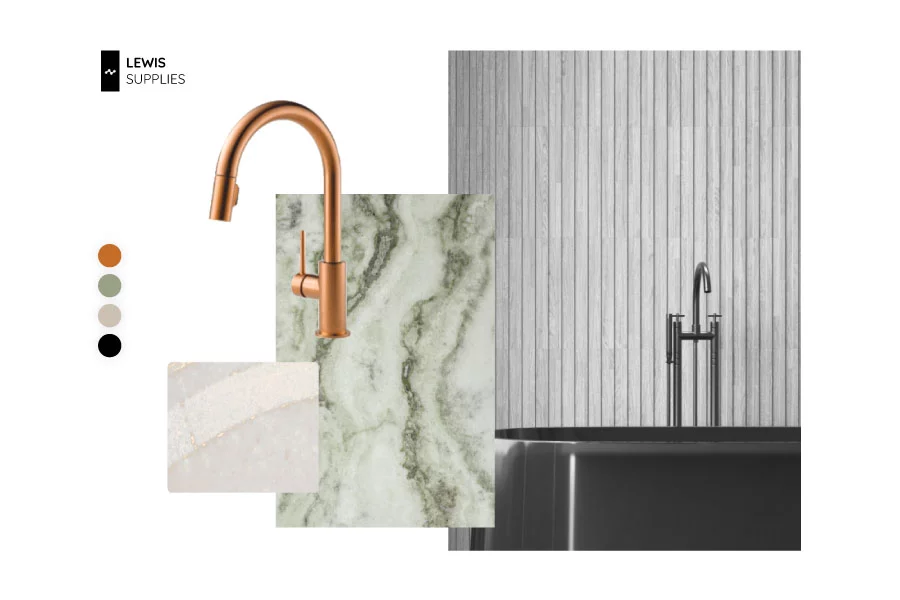
Even if you are a professional photographer or are working with one, it’s important to keep up with the latest trends – checking what other people in the industry are doing.
Product photography done properly could be the deciding factor between your products and another company’s. You can look for inspiration anywhere, starting with Pinterest, Behance, Dribbble, and many other places where designers post their work.
It’s important to remember that, as designers, you need not only to create visually appealing designs, but also to make them functional and easy to navigate.
Here are a few key design aspects to keep in mind when gathering inspiration:
- UX principles: Put the user (or client) first by making the layout easy to grasp and navigate.
- Solve a real problem: Try to identify why certain catalogs perform better than others and apply those principles to increase conversion (we’ll tackle leveraging catalog statistics later in this article).
Designer’s tip: Determine your catalog’s audience before you begin designing. A B2C catalog aimed at individual consumers might highlight lifestyle imagery and emotional appeal, while a B2B catalog for company buyers might focus on detailed specifications and a professional tone. Tailoring your catalog design to its audience can significantly improve its effectiveness.
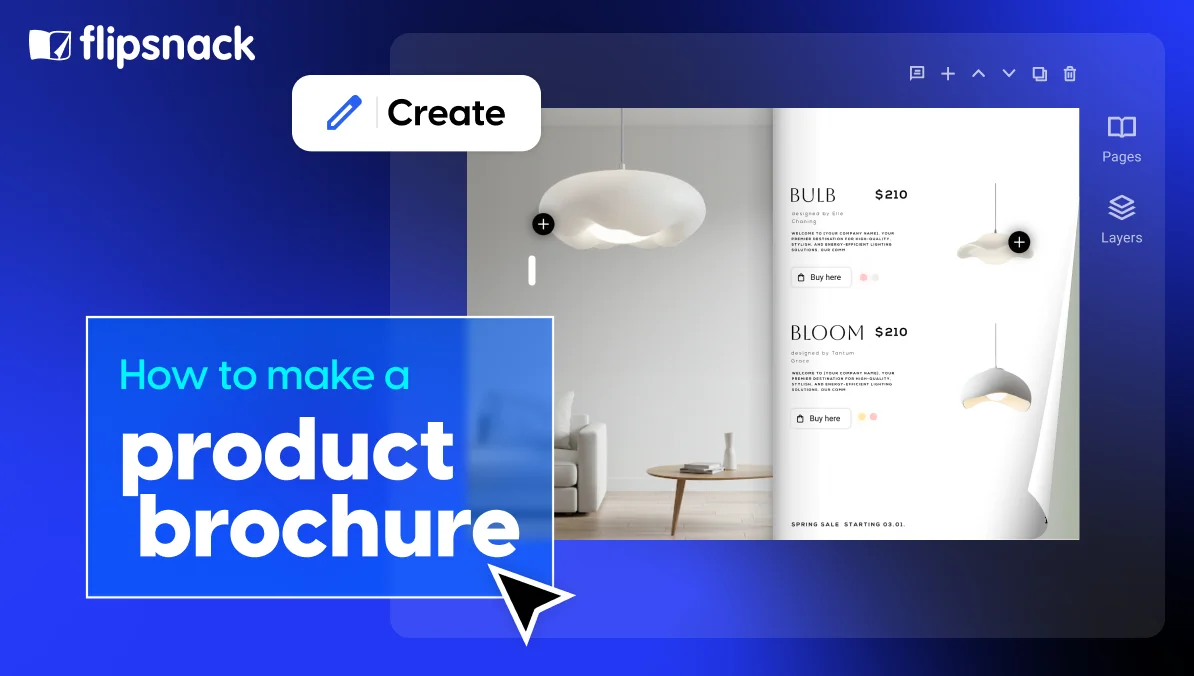
Step 2: Edit your (product) pictures
After your moodboard is complete, it’s time to either create the visual elements (photograph the products alone or with models) or start editing the photos you’ve received from the client.

Let’s say you’re going through this process for the first time.
→ Use a professional editing program (e.g., Adobe Lightroom or Photoshop) to achieve the desired effect for your product images. Photoshop is a pixel editor (any adjustments apply to individual pixels of your file), whereas Lightroom applies global adjustments to the whole image.
→ Learn how to interpret a histogram so you can fine-tune the exposure and tones in your images. Depending on the result you’re after, you might make them darker or use a balanced mix of shadows and highlights.
→ Crop and straighten your images before removing any unwanted elements (spot removal). You can do all of this in Lightroom.
(These steps only scratch the surface of product photo editing, but they’re a good starting point.)
Step 3: Create the document in InDesign
With your inspiration secured and product images edited, it’s time to start creating your document in InDesign.
Before setting up your file, decide whether your catalog is for print or online—Before setting up your file, decide whether your catalog is for print or online—this choice will influence your page size, layout, and color management.
- For print: Choose the appropriate page size according to your print shop’s requirements, and set the Intent to “Print.” Manage color using CMYK swatches and the correct ICC color profile from your printer.
- For digital: Select Web intent (RGB color) for your document. Consider your audience’s devices and where the catalog will be viewed—for example, mobile readers may benefit from a taller page format for easier scrolling.
If you’re not sure where to begin, you can also start with a pre-made InDesign catalog template that fits your vision. You can always adjust the template’s layout to suit your needs.
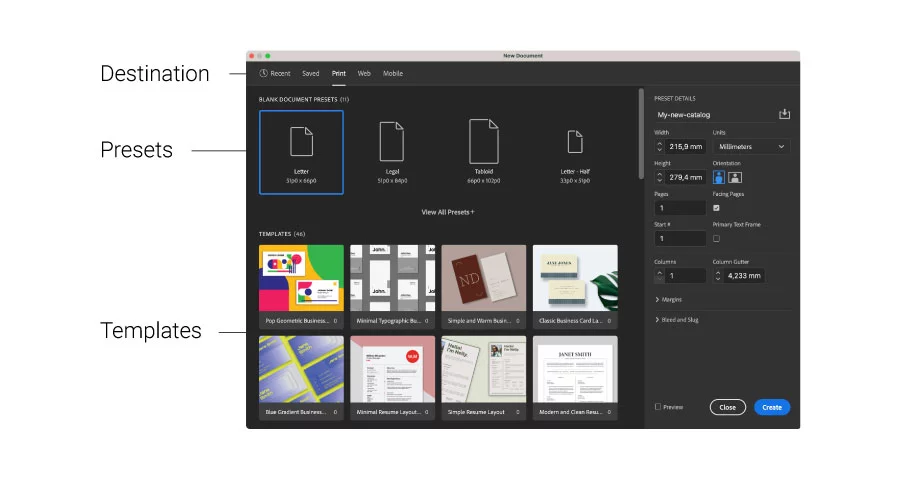
When creating your document in InDesign, specify the following:
- Document preset – You can leave the default settings untouched.
- Intent – Select the intent of your document: print, web, or digital publishing.
- Number of pages – Set the number of pages that your catalog will have. If you are not sure how many you want, you can add more later.
- Page size and orientation – There are many sizes that you can choose from. For example, you can go with size A4, and portrait for orientation.
- Columns: Use a column grid that matches your layout style—two or three columns often work better for product catalogs than a single column.
- Margins: Increase or decrease the margins as you wish. I’ll work with the default.
- Bleed and Slug: The bleed applies to objects that extend past the page edge (not text), ensuring clean trimming. The slug area holds print notes or approval info—use it only if your printer requires it.
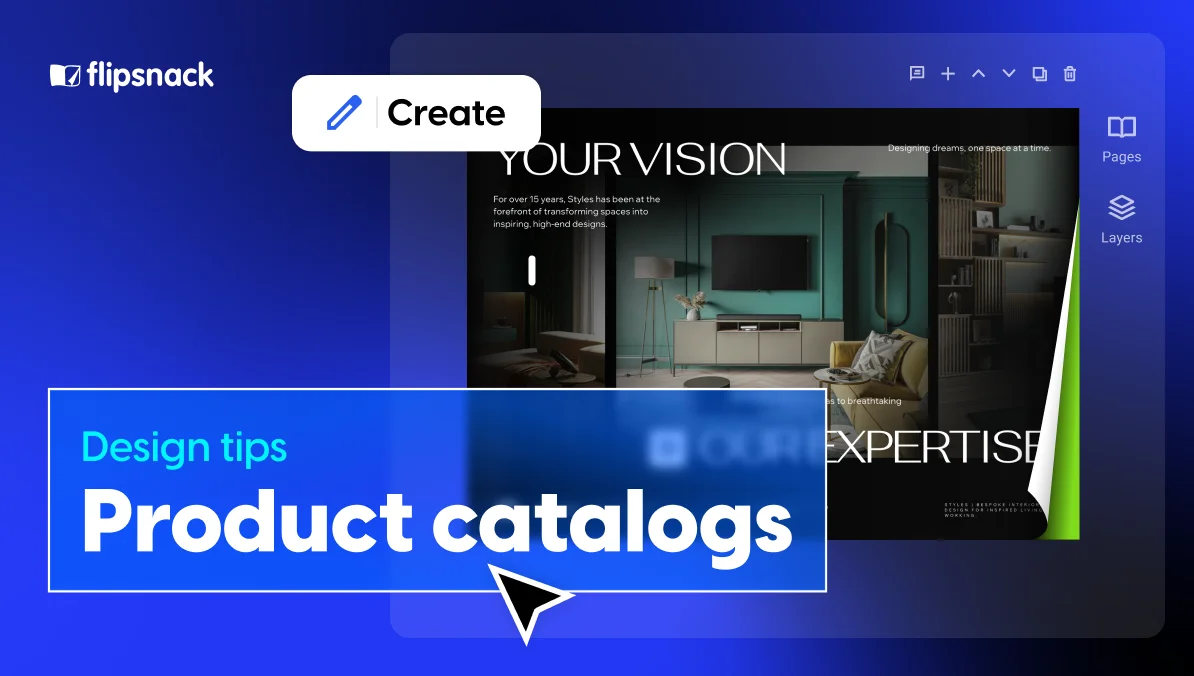
Step 4: Choose the right layout
The right layout depends on what type of pictures you use, how many products you want to include on a page, and on the style you want to use (minimalist, promotional, etc.). You also need to keep in mind the page size you chose at the step before, and how much information (text) will appear for each product.
Designer’s tip: Be bold enough to test two text description variants, one considerably shorter than the other, to see which one converts better. Also, create different layout spreads for situations where:
- The left-side page has a full background image, and the right-side page includes a certain number of products
- Both pages have products
- One page includes a video and one product, while the other has three products
It helps to create all these variations of spreads from the beginning because you can duplicate them, and it gives you a clearer idea of what options you can combine throughout the catalog.
Crafting the InDesign catalog layout
Creating the layout of the catalog is the most creative part since you decide the way in which elements will appear on each page.
- Images: When you flip through a catalog, you definitely first notice the product photos. The photo shoot usually has a concept behind it, and the photos are taken by experienced photographers. Feel free to apply the tips we already shared in the previous section to experiment and to make something awesome, creative, and unique.
- Product details: Your catalog must contain a description and price for every product. This will give the client more information about the product and convince them to buy it. Make them visible, but don’t make them stand out too much. Let the product images be the focus.
- White space: Don’t use all the white space; let your layout breathe. If you add too many unnecessary shapes, that could make the catalog cluttered, and your products will not get all the attention they deserve.
- Fonts: Every font tells a story. Choose the best pair of fonts that go well with your content and target audience. Also, it’s best to choose the ones that are part of your brand’s kit.
- Colors: Colors are an important design element, so choose the right palette for your catalog. If you sell eco products, for example, opt for a nature-inspired palette (tones of gray, brown, or green). Consistency is key – stick with hues that align with your brand’s message and style. (We’ll share an insider trick for adjusting color shades later in this guide.)
Step 5: Structure catalog information using InDesign elements
At this stage, you already have your images, text, and layout direction ready. Now it’s time to organize everything properly in InDesign so that your catalog looks professional and stays consistent from start to finish.
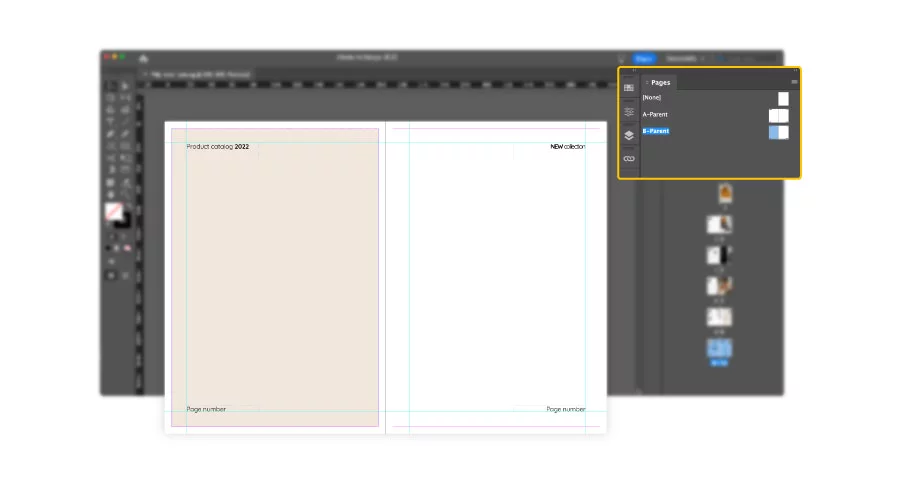
Set up your parent pages (formerly called Master pages)
Parent pages (formerly called master pages) are your foundation. They hold repeating elements such as headers, footers, page numbers, and guides. Once you apply a parent page to your document, those elements automatically appear on every page that uses it.
Use this to maintain consistency across your catalog without needing to copy and paste design elements.
Designer’s tip: Save paragraph, character, and object styles early in the process. These styles will control the look of your text across the entire document, and any later edits you make to a style will update everywhere it’s used.
Clarify page types: In the Pages panel, “None” refers to a Parent page that removes inherited elements, not a “regular” page. Regular pages simply display your catalog content.
Create and organize layout elements
Start adding the main building blocks of your catalog: image frames, text boxes, and shapes. These will help you arrange your product photos, names, descriptions, and prices in a structured way.
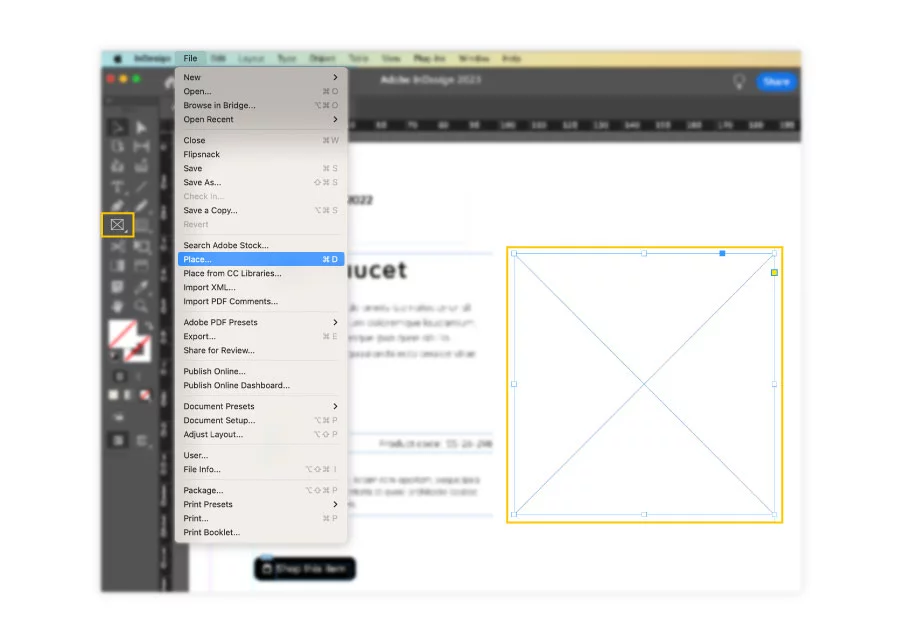
- Image frames:
Use the Rectangle Frame Tool (F) to draw an image placeholder. Then go to File > Place to insert a product photo. Click the circular icon in the center to move or resize the image within the frame. If the image doesn’t fit perfectly, use the Fitting options to adjust it automatically.
- Text boxes:
Use the Type Tool (T) to create text areas for titles, descriptions, and prices. Apply the paragraph styles you saved earlier for consistent formatting. This keeps your typography uniform across all product pages.
- Shapes and design accents:
You can add rectangles, circles, or lines from the shape tools in the left sidebar to highlight sections or separate content. Change their color or stroke thickness from the top menu to match your catalog’s visual identity.
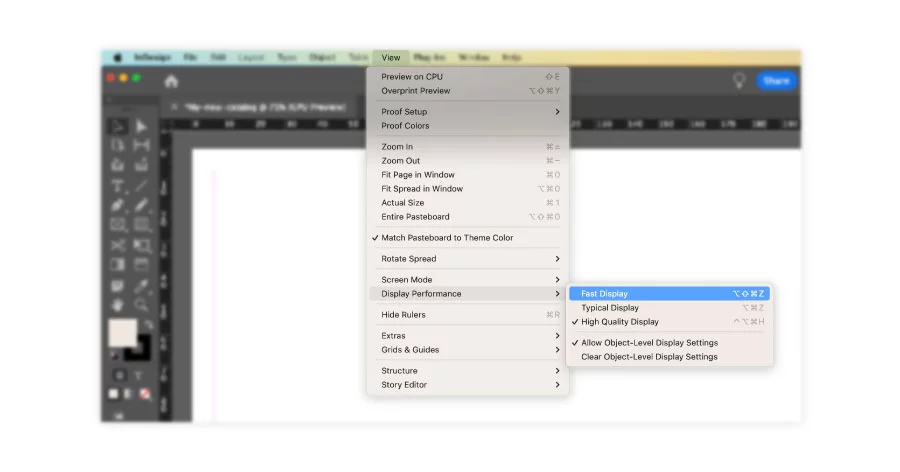
Keep performance and consistency in mind
If InDesign starts to slow down, switch to Fast Display mode for better performance. Don’t worry if your images look pixelated in this mode—they’ll appear in full quality when you export your catalog.
Before exporting or sending to print, use File → Package to collect fonts and linked images. This ensures your printer or teammate receives every asset correctly.
Step 6: Add new pages, create a spread
Getting to know the world of pages in InDesign is how you can achieve visually captivating and structurally sound digital catalogs. There is a lot that can be debated and expressed about the basics of InDesign pages. But I think that what you would be most interested in is how you can become more productive when it comes to creativity and spend less time manually editing your catalog’s pages.
Types of pages in InDesign
If you don’t know from the beginning how many pages your catalog will have, it’s not a problem. You can add more pages at any time. First, you have to open the Pages panel, which shows how many pages and spreads you are working on. Click the Window menu from the top bar, and choose Pages.
When the Pages panel opens, you will notice that there are two kinds of pages: None and Parent pages. The first is a regular page, to which you can add as many elements as you want, and they will appear only on that page.
The Parent page, however, will apply the elements that you place on this type of page to all the other pages, just like I mentioned previously. For example, you can add page numbers or a link to your website in the footer of all the pages of your catalog. Keep in mind that you can work with as many Parent pages as you want.
Add pages manually, or you can increase the page count automatically using the Pages panel and clicking on the plus button. To maintain the same layout, you can add individual pages, page spreads, or duplicate spreads.
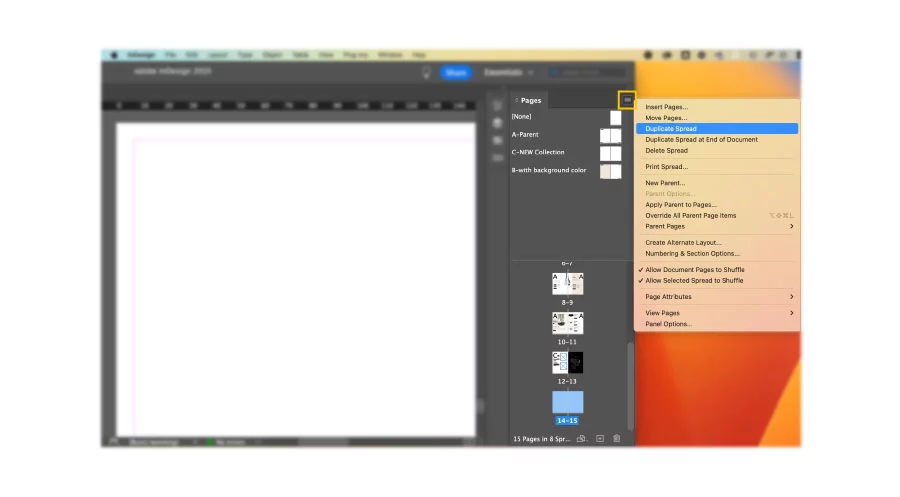
If you know exactly how many pages you want your catalog to have, you can add several pages automatically. Open the Pages panel and left-click on the submenu in the top-right corner. Fill in the number of pages you want to add. Select whether the new pages should precede or follow a certain page, then specify the page number that the new pages should follow or precede. Choose the type of page (None or Parent), and click OK.
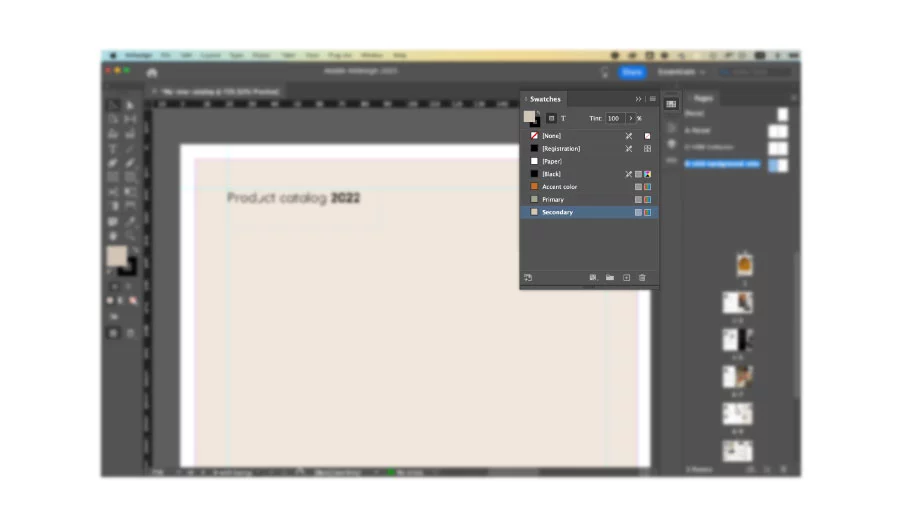
Color swatches vs unnamed colors
When creating design systems to ease your work, colors are a big part of the process. Apply color to objects in InDesign using several methods. First, use the Color Picker, creating an unnamed color with limitations. Second, create swatches that give you increased flexibility.
Here is why using unnamed colors limits and slows down the creative process:
- It makes it difficult to easily use the same color again on another object.
- When you apply the color to several objects, you can’t modify that specific color.
- If you need to change the color throughout the document, you will have to do it manually.
Unnamed colors make your work much more time-consuming. Color swatches, on the other hand, allow you to change and apply the same color throughout your document easily. Follow the same method described above, with an extra step: when you are defining a color, there is a button that allows you to save that color as a swatch. This adds the color to the Swatches panel. Change the swatch properties by double-clicking on the swatch and renaming it to make it easier to recognize when editing.
There is another way to create a color swatch by skipping the Color Picker. Click on the New Swatch button at the bottom of the Swatches panel. Hold down the Alt (Windows) or Option (Mac) key when clicking the New Swatch button to display the Swatch Options dialog box, so you can set all the properties of the swatch at that time.
With all the objects and elements added to Parent pages or regular pages, we’re approaching the finish line. A good practice is to leave the front and back covers for the end, using this opportunity strategically.
Step 7: Design the front and back cover
Once you have the layout and the spreads created – filled with images, videos, product descriptions – it’s time to tackle the front and back covers of your catalog. The cover is very important for every publication. It has to be catchy to hook the attention of the reader. I recommend using attractive color swatches and representative illustrations for what the viewer will find within the catalog.
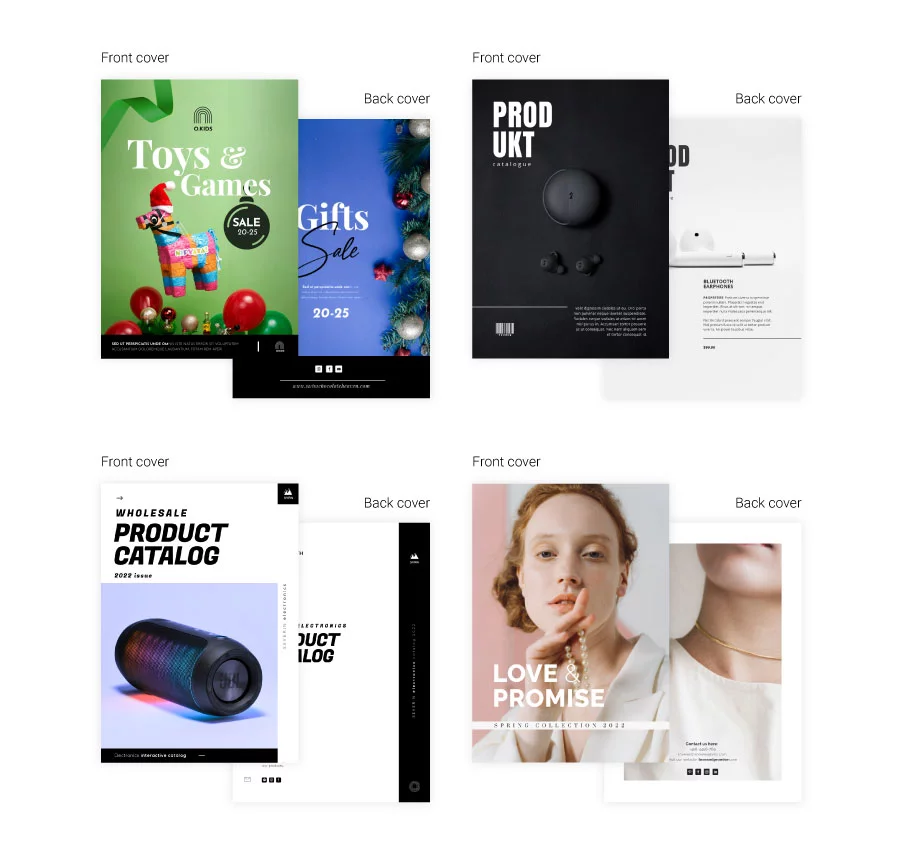
Include branding elements, such as your logo, and use the right font for the title of the catalog. To place the logo and the title on the cover image, create two boxes. Then, insert the desired elements and place the boxes on top of the photo.
To bring a box to the front or send it to the back, click on the box that you want to move. Right-click on it and select Arrange. You’ll have options like: Bring to Front, Bring Forward, Send Backward, and Send to Back.
The back cover should be used for important contact information like address, phone number, and email, so that potential buyers know how to get in touch with you. As for the design, keep the same colors, fonts, and layout as in the rest of the catalog.
Step 8: Export your digital catalog
You should take a moment to celebrate your (first) InDesign catalogue. It is not an easy task, and depending on how many products you have to showcase, it can become overwhelming or the design can get repetitive. Regardless of how much effort you put into creating your product catalog, we have finally reached the exporting stage.
Start with the purpose of your InDesign catalogue: print or digital. Once identified, you either need to abide by print shops’ requirements or take into consideration certain web presets if your catalog has interactive elements like product videos, embedded slideshows, etc.
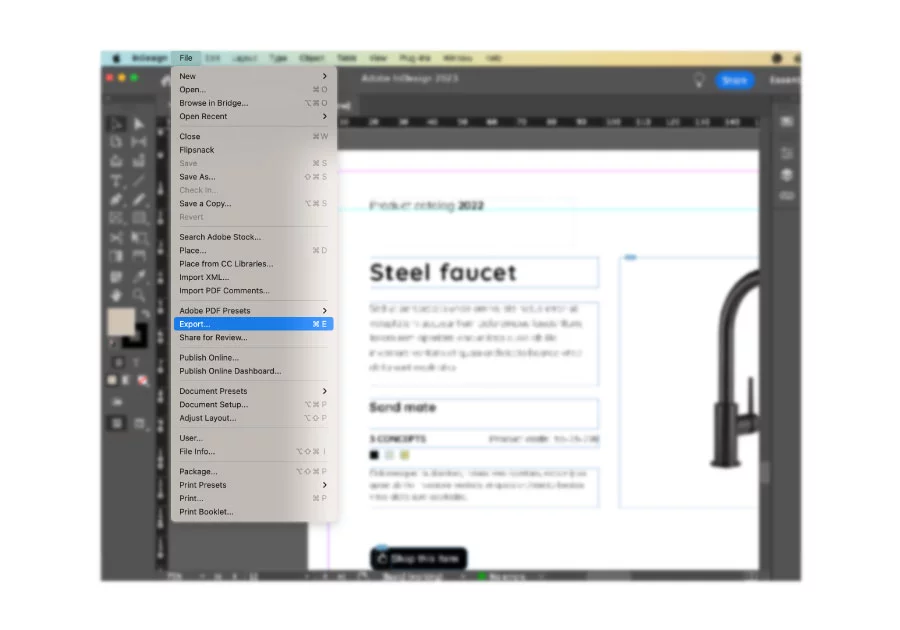
How to export your catalog for print in InDesign
Go to File → Export. Name your document as you wish. Now, open the Format dropdown menu and choose Adobe PDF (Print). Next, click Export. When you save it, you will be presented with another export dialog.
There are specific catalog requirements that you must respect if you want to print your design. If you open the PDF, you will notice some marks on the margins: they are trim marks to show the printer where to cut the edges.
How to export your digital catalog from InDesign for web
To avoid any problems in the next steps, we will do a reset of the document configuration. Go to File → Document Setup. Uncheck the Facing Pages option and click OK.
Once you have done this, make a copy of the document with a different configuration: go to File → Save As. Give it a name that differentiates it from the version that has facing pages.
Now, go to File → Export. Name the document however you want. Under Format, choose Adobe PDF (Interactive). When you save it, another export dialog will appear.
Note: Interactive PDFs may not display all features (like video or buttons) in every viewer. If you want guaranteed interactivity, publishing through Flipsnack is the better option since it converts your PDF into an HTML5 flipbook that works across devices.
Accessibility tip: Before exporting, open the Articles panel to set reading order and enable “Create Tagged PDF” in the export dialog. This makes your digital catalog more accessible and screen-reader friendly.
Step 9: Publish your catalog (via hosting service or a web app)
Before you publish, save your catalog as an InDesign Template (.indt). This preserves parent pages, paragraph and character styles, object styles, swatches, and grids so your team can start the next catalog from a clean copy without overwriting the original. It also keeps your layout rules consistent across seasonal or multi brand editions.
Once finished, share your professional InDesign catalogue online as a PDF link. If you want to create an online catalog from it, you have two main options to reach your audience:
A) Publish via hosting service
Your first option applies if your website has a hosting service (such as InMotion). The only thing you have to do in this case is upload the PDF file to your server, and then use it directly from there.
B) Publish via specialized web app
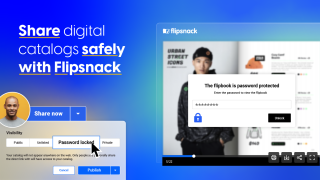
Your other option is using a specialized web app for digital catalogs, like Flipsnack – essentially an online catalog maker platform. Flipsnack’s digital catalog maker, one of the best online catalog creation tools available, allows you to distribute your product catalog easily by sharing its full-view link with your intended audience.
The way this process works is by converting your PDF to an HTML5 flipbook once you upload the digital file to Flipsnack. A flipbook is an improved reading experience that enhances the interactions you added to the PDF and simulates the page-flipping effect of a printed catalog. In other words, it transforms your static PDF into an interactive online catalog.
If you want to experience the power of Flipsnack’s interactivity in your InDesign catalog, check out the example below. From dynamic elements like captions for detailed product descriptions to shopping buttons that enable orders directly within the catalog, Flipsnack brings your catalog to life.
Your catalog can also be downloaded from Flipsnack, and at the same time, you have the opportunity to check the catalog statistics.
Moreover, you can find inspiration in flipbook catalog examples or use the product catalog templates to make your catalog look more professional. There are many extra interactive features you can add to enhance the shopping experience – for example: shopping lists, product tags, photo slideshows, and more.
You do not have to worry about your InDesign flipbook looking different based on the device used to access it. Just share the catalog’s responsive link on any platform to reach your customers faster than with traditional distribution methods.
Flipsnack’s InDesign catalog extension
If you’d rather skip some of the steps we mentioned in the previous section, you can use our InDesign catalog extension. Think of it as an InDesign catalog builder that streamlines the process – this extension saves you time by importing Adobe InDesign PDF files directly into your Flipsnack account.

Through a simple installation process, you’ll have access to this extension, and your PDF file will be instantly exported to your Flipsnack account. The same principle applies to your original interactions available in Flipsnack.
Create a high-impact InDesign catalog with Flipsnack
Now that you know how to create a catalog in InDesign, it’s time to take it further. A professional B2B sales catalog needs more than great design. It needs the right tools to enhance engagement and simplify ordering.
With Flipsnack’s InDesign extension (an InDesign catalog builder plugin), you can seamlessly turn your static catalog into an interactive digital experience with embedded links, shopping buttons, and easy sharing options. Explore your options, optimize your workflow, and create catalogs that truly convert.
Frequently asked questions about creating catalogs in InDesign
Avoiding common mistakes such as neglecting the bleed settings, overusing fonts and colors, and not optimizing images for print can greatly improve the quality of a catalog. Ensuring consistency in design elements and maintaining a balance between text and images are also crucial for a professional look.
Making your catalog accessible involves using tagged PDF features, ensuring sufficient contrast between text and background, and using alt text for images. InDesign offers several tools to assist with creating accessible documents, emphasizing the importance of readability and navigability. And once you bring your InDesign document to Flipsnack, you can add alt text directly from our platform, as well.
InDesign integrates seamlessly with Adobe Creative Cloud apps such as Photoshop for image editing and Illustrator for vector graphics, enabling a streamlined workflow. This integration allows designers to easily incorporate various elements into their catalogs, enhancing creativity and efficiency. InDesign also integrates with Flipsnack’s platform to create InDesign flipbooks that are easy to track.
You can create your own catalog template in InDesign by setting up parent pages, paragraph styles, and color swatches to ensure consistency across your catalog. Once you’ve defined the layout, save it as a template file (.indt) so you can reuse it for future projects. Alternatively, you can download a pre-made InDesign catalog template that matches your design needs and customize it with your branding, product details, and imagery. This approach saves time and helps maintain a professional, cohesive look across all your catalogs.