How to Make a Table of Contents for an Interactive PDF
Last updated: July 1st, 2025
A well-structured PDF is easy to navigate, but nothing improves navigation more than a clickable, interactive table of contents (TOC).
Whether you’re creating reports, eBooks, catalogs, or manuals, adding a TOC can save your readers time and make your content feel more professional.
While tools like Microsoft Word or Google Docs can generate basic TOCs, they often fall short when it comes to interactivity and visual appeal, the kind you get in a PDF flipbook.
That’s where Flipsnack comes in, an easy-to-use flipbook maker.
In this guide, we’ll walk you through multiple ways to create a table of contents so that in the end you can add a TOC to your interactive PDF using Flipsnack’s table of contents maker. Or you can do it using Flipsnack.
If your goal is to stand out and engage people, this is how you do it.
Table of contents
- What is the use of a table of contents
- Benefits of a TOC in digital documents (especially in Flipsnack)
- I. How to create a table of contents in Word
- II. How to create a table of contents in Adobe InDesign
- III. How to create a table of contents in Flipsnack
- IV. How to create a table of contents in Google Docs
- V. How to create a table of contents in Adobe Acrobat Pro
- VI. How to create a table of contents in Apple Pages
- Best practices for table of contents design
- Conclusion
What is the use of a table of contents
A table of contents (TOC) is a structured list of sections, chapters, or key topics found in a document, typically organized in the order they appear. Each entry usually includes a title and a page number or, in digital documents, a clickable link that jumps directly to the section.
The main purpose of a TOC is navigation. It acts like a roadmap, helping readers quickly scan what the document includes and go straight to what interests them. Without it, especially in longer PDFs or publications, users are left scrolling aimlessly.
In digital formats, a TOC becomes even more valuable when it’s interactive, letting readers tap or click on sections to move instantly within the document.Let’s see how you can make an interactive table of contents in Flipsnack, and then how to create a table of contents using other platforms that allow you to download your work as PDF (then bring it to Flipsnack).
Benefits of a TOC in digital documents (especially in Flipsnack)
When used in combination with a digital publishing tool like Flipsnack, the table of contents becomes much more than just a convenience:
- Clickable navigation: Readers can jump between sections instantly, no scrolling or guessing required. In Flipsnack, TOC links work across desktop and mobile devices.
- Cleaner UX: A well-placed TOC sidebar or pop-up keeps your design clean while still offering fast access to content.
- Faster content discovery: Whether it’s a product catalog, an internal presentation, or a digital magazine, a TOC helps users find what they need in seconds.
- Professional appearance: TOCs give your publication structure and it also looks good. Without one, even the most beautiful layout feels unfinished.
- Increased engagement: When readers can navigate easily, they stay longer. Flipsnack analytics can even show you what sections people click on most so you know what’s working.
- More accessible content: A TOC is essential when it comes to accessibility and usability. It’s one of the simplest ways to improve document usability across all devices.
Now that we’ve walked through the benefits, let’s see how to create a table of contents in Adobe, Flipsnack, and other popular platforms.
Note: Flipsnack offers a free trial so you can test most premium features. After that, there’s the free plan if you only need basic PDF interactivity and plan to create a limited number of flipbooks.
I. How to create a table of contents in Word
Step 1: Use heading styles
Word builds TOCs based on heading styles. That means you must apply built-in styles like Heading 1, Heading 2, etc., to your section titles.
- Select a chapter or section title.
- Go to the Home tab.
- In the Styles group, click Heading 1 for main sections, Heading 2 for sub-sections, and so on.
💡Keep in mind that Word won’t recognize bold or enlarged text manually for the TOC.
Step 2: Insert the table of contents
Once your headings are in place:
- Click where you want the TOC to appear (usually at the beginning of the document).
- Go to the References tab.
- Click Table of Contents and choose one of the built-in automatic styles (e.g., Automatic Table 1).
Word will now generate a clickable TOC based on your headings.
Step 3: Customize the TOC (optional)
You can tweak how the TOC looks or what levels of headings it includes:
- Click anywhere in the TOC.
- Choose Custom Table of Contents from the drop-down.
- Adjust how many heading levels to display (e.g., Heading 1–3).
- Modify formatting and tab leaders if needed.
Step 4: Update the TOC automatically
If you make changes to your headings or page numbers:
- Click the TOC.
- Choose Update Table → either Update page numbers only or Update entire table.
Step 5: Export to PDF without breaking the TOC
Never leave an outdated TOC, especially if you’re exporting to PDF.
This is an important step. If you don’t export correctly, your clickable links will break.
Do NOT use Print > Save as PDF.
Instead:
- Go to File → Save As or Export.
- Choose PDF as the file format.
- Click Options and make sure Create bookmarks using headings is checked.
- Save the file.
- However, if you do not have Adobe Acrobat Pro, use this free PDF to Word Converter online. Just upload your PDF to it, convert, and download as Word document.
This ensures your TOC remains clickable in the PDF version.
💡Uploading to Flipsnack: If you plan to upload your PDF to Flipsnack, keeping your TOC clickable means your digital flipbook will support smooth in-document navigation from the start. No extra work needed.
II. How to create a table of contents in Adobe InDesign
Adobe InDesign gives you full design control over your documents—including how your table of contents looks, behaves, and exports. It’s not automatic like Word or Docs, but it’s powerful if you follow the correct steps. Done right, you get a professionally designed, fully clickable TOC in your PDF.
Step 1: Use paragraph styles for TOC entries
InDesign builds TOC entries based on Paragraph Styles, not on manual formatting or font size.
- Apply consistent paragraph styles (e.g., Chapter Title, Heading 1, Subhead) to all the content you want listed in the TOC.
- To create or edit styles: go to Window → Styles → Paragraph Styles.
💡 These styles act as markers for the TOC generator.
Step 2: Generate the TOC and configure bookmark settings
Once your styles are set:
1. Go to Layout → Table of Contents.
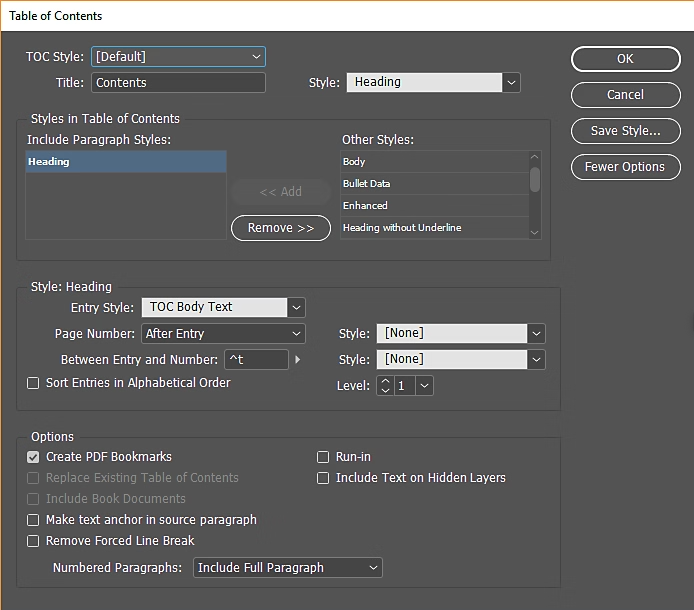
2. In the dialog box:
- Title: Enter a heading like “Contents”.
- Include Paragraph Styles: Select the styles you want InDesign to pull from (e.g., Chapter Title) and add them to the right-hand column.
- Choose a style for the TOC entries (or create one).
- Check Create PDF Bookmarks — this ensures entries appear as clickable bookmarks in the final PDF.
- Optional: Choose Replace Existing Table of Contents if you’re updating an existing one.
3. Click OK, then click in the document where you want to place the TOC.
Step 3: Customize the TOC Appearance (Optional)
After placement, you can adjust:
- Fonts, sizes, and colors
- Indents for subheadings
- Tab leaders (e.g., dotted lines between section titles and page numbers)
⚠️ The TOC is static. If your content changes, you must regenerate it:
- Go to Layout → Update Table of Contents.
Step 4: Export to PDF with clickable links and bookmarks
To retain all interactivity:
- Go to File → Export.
- Choose Adobe PDF (Interactive).
For Adobe PDF (Print), go to the Include section and check:- Hyperlinks
- Bookmarks
- Also check Create Tagged PDF for accessibility.
This ensures:
- TOC entries are clickable in the PDF.
- PDF readers display a clickable bookmark panel (especially useful in long documents).
💡Uploading to Flipsnack: If exported correctly, your InDesign PDF will keep all TOC links and bookmarks intact when uploaded to Flipsnack. This means your audience gets smooth in-document navigation.
III. How to create a table of contents in Flipsnack
Flipsnack offers two primary methods to add a TOC to your flipbooks: importing from a PDF or creating one from scratch.
A. Import a TOC from a PDF
If your PDF includes a properly formatted table of contents, Flipsnack can detect and import it automatically. To make that possible, the file must be prepared for interactivity from the start. But don’t worry, we’ll walk through how to do that on each platform.
Steps:
- Activate TOC: If Flipsnack detects the TOC, it will appear in the navigation bar. You can edit, remove, or add new chapters or subchapters as needed.
- Upload your PDF: Ensure your PDF has a properly formatted TOC. Avoid exporting the PDF as a spread, as this might hinder TOC detection.
- Access the customize page: After uploading, you’ll be redirected to the Customize page.
B. Create a TOC from Scratch
If your PDF doesn’t have a TOC or you’re creating a flipbook from scratch:
1. Navigate to Customize: While in Design Studio, click on Customize.
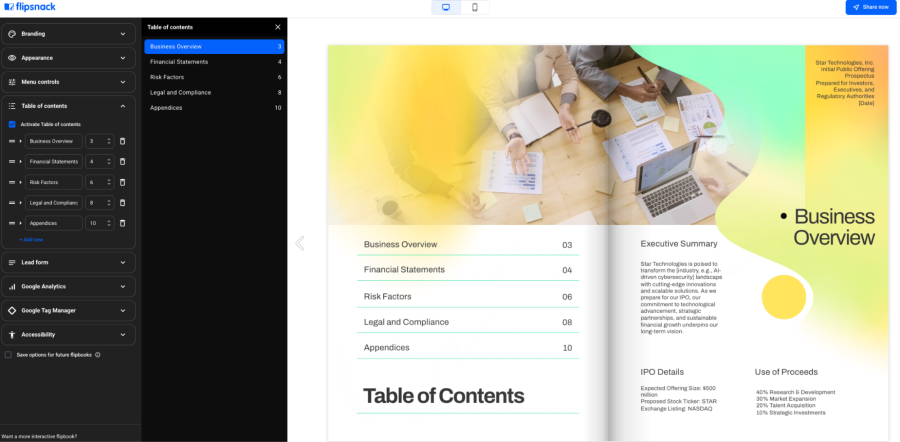
2. Access TOC settings: In the left-hand menu, select Table of Contents.
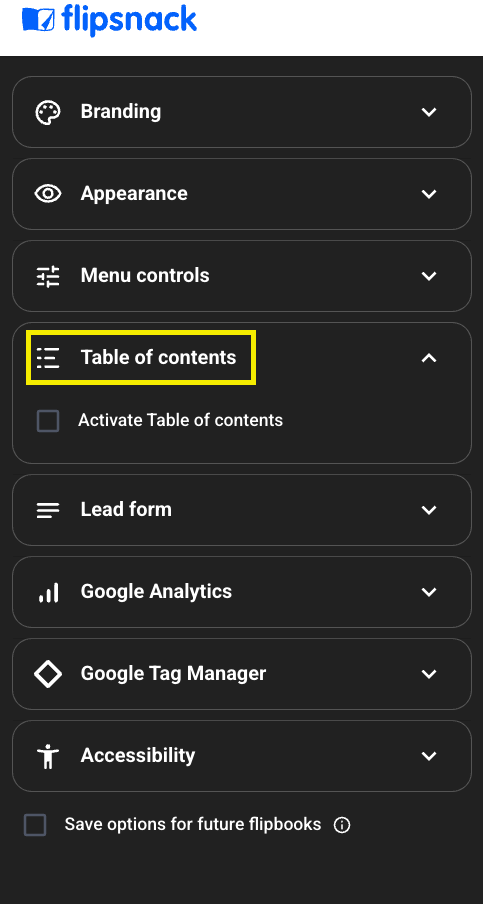
3. Activate Table of contents: Check the box labeled Activate Table of Contents to enable it in your flipbook.
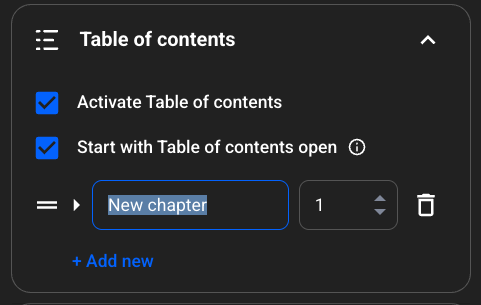
4. Start with table of contents open: Check this box if you want to set your publication to open with the Table of Contents already expanded. This makes it easier for readers to navigate from the very beginning. Note: this box will appear only if you activate the table of contents.
5. Add chapters/subchapters: Click Add new to insert a chapter or subchapter. Enter a name and assign it to the appropriate page number.
6. Edit as needed: You can edit, reorder, or delete chapters and subchapters anytime.
How to edit an existing TOC in Flipsnack
Whether imported or created manually, you can edit the TOC:
- From the main dashboard: Select your flipbook, click Customize, then Table of Contents.
- From the details page: Click on a flipbook, select Details, then Customize.
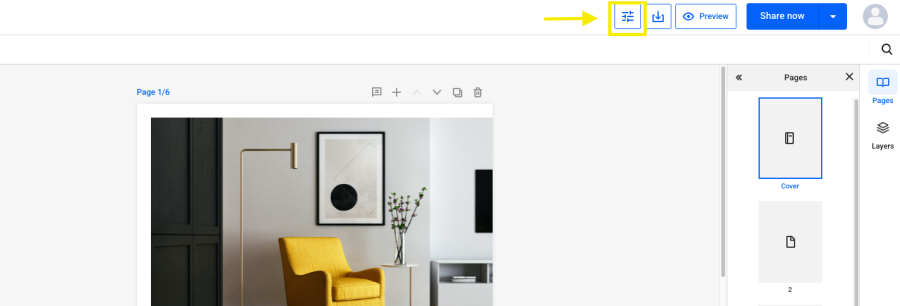
- From the design studio: While editing, click the Customize preview button in the top right corner.
In the TOC settings, you can add new chapters, edit names, assign specific page numbers, and reorder entries.
You can read more about how to edit an existing table of contents.
Important considerations
- Page rearrangement: If you rearrange pages, the TOC entries will automatically update to reflect the new structure.
- Page deletion: Deleting a page linked in the TOC will result in a non-functional TOC entry. You’ll need to delete or reassign it.

Next, we’ll walk through the process of creating a table of contents on different popular platforms for your interactive PDF.
IV. How to create a table of contents in Google Docs
Google Docs makes it simple to create a table of contents but only if you use the right formatting. If you skip the proper structure, the TOC won’t work, and your exported PDF will just be static text.
Here’s how to do it right.
Step 1: Apply heading styles
Just like in Word, the TOC in Google Docs pulls from heading styles, not manual formatting.
- Highlight your section title.
- Go to the top-left dropdown (it says “Normal text” by default).
- Select Heading 1 for main sections, Heading 2 for subsections, and so on.
💡 You can customize these styles (font, size, color) and then update the style if needed. Just right-click the heading → Update heading to match.
Step 2: Insert the table of contents
Once all headings are applied:
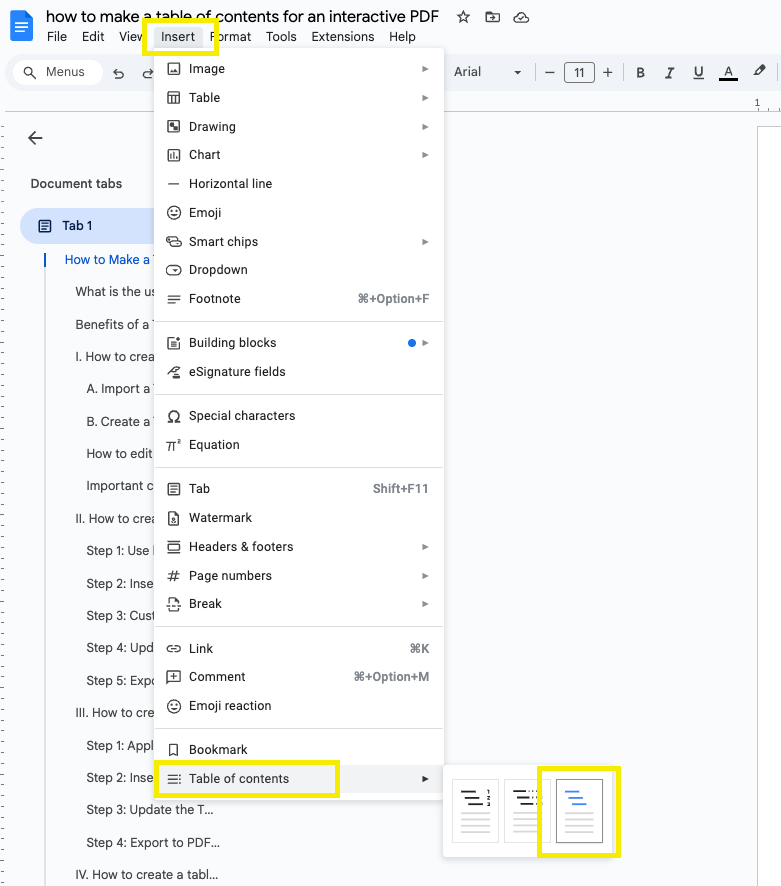
- Place your cursor where you want the TOC.
- Go to Insert → Table of contents.
- Choose a format:
- With page numbers (static, more traditional).
- With blue links (interactive TOC that’s clickable).
For digital documents or PDFs, choose blue links. This keeps your TOC clickable in the final output.
Step 3: Update the TOC when you make changes
Google Docs doesn’t auto-refresh the TOC when you make changes to your headings. You must do it manually:
- Click inside the TOC.
- Click the refresh icon in the top-left corner of the TOC box.
If you don’t do this, you’ll have outdated entries and broken navigation in your final PDF.
Step 4: Export to PDF with a clickable TOC
To preserve interactivity when exporting:
- Go to File → Download → PDF Document (.pdf).
- Do not use browser “Print” → Save as PDF. That breaks links.
- The downloaded PDF will maintain your clickable TOC as long as you chose the blue-links version.
💡 Uploading to Flipsnack: If your exported Google Docs PDF includes clickable TOC links, Flipsnack will retain them in your flipbook. No need to re-link anything—your readers can jump between sections immediately.
V. How to create a table of contents in Adobe Acrobat Pro
While you can’t create a table of contents in Adobe Acrobat, Adobe recommends converting your PDF to Word, adding a TOC there, and exporting it back as a clickable PDF.
Here’s how to make an Adobe acrobat table of contents.
Step 1: Export Your PDF to Word
- Open your PDF in Adobe Acrobat Pro.
- Go to Tools → Export PDF.
- Choose Microsoft Word (.docx).
- Click Export and save the file.
Step 2: Add the TOC in Microsoft Word
- Open the exported Word document.
- Apply Heading Styles to section titles.
Go to References → Table of Contents and insert an automatic TOC.
Step 3: Export Back to PDF
- In Word, go to File → Export → Create PDF/XPS Document.
- Make sure hyperlinks and bookmarks are preserved (do not print to PDF).
- Save the final PDF.
You now have a clean, clickable table of contents, fully functional in most PDF readers.
VI. How to create a table of contents in Apple Pages
If you’re working on a Mac, Apple Pages offers solid TOC functionality but only if you use its built-in structure properly. The TOC can be automatically generated and even updated in real time, just like in Word or Google Docs.
And yes, you can export to PDF and keep it clickable. Here’s how.
Step 1: Use heading styles
Just like Word and Google Docs, Pages builds the TOC based on styled headings.
- Select the text for your section title.
- Go to the Format panel → Style tab.
- Apply a paragraph style like Heading, Heading 2, etc.
You can customize these styles (font, size, color) to match your layout but Pages needs them defined as headings to include them in the TOC.
Step 2: Insert the table of contents
- Place your cursor where you want the TOC to appear (usually at the beginning).
- Go to Insert → Table of Contents.
- Choose from:
- Document TOC (includes all headings)
- Section TOC (headings within the current section)
- TOC for This Page
Pages will generate a live, scrollable TOC that updates automatically as you add or change section headings.
Step 3: Customize the TOC formatting
- Click on the TOC block.
- In the Format sidebar, you can:
- Adjust indentation and spacing
- Choose which heading levels to include
- Change text size, font, and color
⚠️ Apple Pages doesn’t let you manually edit TOC entries (they’re generated from styles), but you can control how they appear.
Step 4: Export to PDF with an interactive TOC
To keep your TOC clickable in the final PDF:
- Go to File → Export To → PDF.
- Choose Best image quality.
- Make sure “Include Table of Contents” is checked.
- Export the file.
This will preserve clickable TOC links that work in most PDF readers.
And again, don’t “Print to PDF” using Command + P—that creates a static TOC with no clickable links.
💡 Using your Apple Pages PDF in Flipsnack: If your TOC links work in the exported PDF, they’ll stay functional when you upload it to Flipsnack.
Best practices for table of contents design
A table of contents should do more than list section titles. It needs to be easy to read, simple to use, and visually consistent with the rest of your document. These best practices apply to both static PDFs and interactive flipbooks like those made in Flipsnack.
1. Maintain consistency in formatting
Use the same font, size, and style across all TOC entries. Apply heading levels consistently—use bold for main sections and regular or indented text for subsections. Keep the layout aligned and use uniform spacing. If your TOC uses dots or lines to lead to page numbers, make sure they appear the same way for every entry.
A consistent TOC looks more professional and is easier to scan.
2. Ensure clarity
Use clear, descriptive section titles. Avoid vague labels like “Section 1” or “Part A” unless you also include a short title that explains the content.
3. Optimize for digital use
In digital documents, your TOC should be clickable. Each entry should take the reader directly to the section it refers to. Use hyperlinks or bookmarks to create this experience.
For tools like Flipsnack, you can activate a built-in TOC that links directly to pages. Make sure it works well on both desktop and mobile. Buttons and links should be easy to tap, and navigation should be smooth.
A functional digital TOC saves time and improves the reading experience.
Conclusion
A clear, clickable table of contents makes any PDF easier to use and more professional. Whether you’re working in Word, Google Docs, or InDesign, building a proper TOC is worth the effort, especially if you plan to share your content digitally.
If you’re looking for a simple way to turn your PDF into an interactive, easy-to-navigate flipbook, Flipsnack can help. It keeps your TOC links intact and also lets you create or customize a table of contents directly in the platform.
No matter your document type, a well-made TOC is a small detail that makes a big difference.